Gamma correction controls the overall brightness of an image. Images which are not properly corrected can look either bleached out, or too dark. It is a nonlinear operation used to code and decode luminance or tristimulus values in video or still image systems.
Gamma encoding of images is used to optimize the usage of bits when encoding an image, or bandwidth used to transport an image, by taking advantage of the non-linear manner in which humans perceive light and color.
Human vision, under common illumination conditions (not pitch black nor blindingly bright), follows an approximate gamma or power function, with greater sensitivity to relative differences between darker tones than between lighter ones. If images are not gamma-encoded, they allocate too many bits or too much bandwidth to highlights that humans cannot differentiate, and too few bits/bandwidth to shadow values that humans are sensitive to and would require more bits/bandwidth to maintain the same visual quality.
Showing posts with label BSA101. Show all posts
Monday, April 11, 2016
Saturday, April 9, 2016
BSA101: Composition and framing, the Rule of Thirds and the Golden Spiral (Week 7)
Composition and Framing
When it comes to cinematography, composition and framing is important. It is the technique of drawing attention to the subject of your image by blocking other parts of the image with something in the scene. These includes the Rule of Thirds and the Golden Spiral.
There are different shots that are important when it comes to framing your subject. Key shot frame includes:
Extreme Long Shot
This can be taken from as much as a quarter of a mile away, and is generally used as a scene-setting, establishing shot. It normally shows an exterior, e.g. the outside of a building, or a landscape, and is often used to show scenes of thrilling action e.g. in a war film or disaster movie.
When it comes to cinematography, composition and framing is important. It is the technique of drawing attention to the subject of your image by blocking other parts of the image with something in the scene. These includes the Rule of Thirds and the Golden Spiral.
There are different shots that are important when it comes to framing your subject. Key shot frame includes:
Extreme Long Shot
This can be taken from as much as a quarter of a mile away, and is generally used as a scene-setting, establishing shot. It normally shows an exterior, e.g. the outside of a building, or a landscape, and is often used to show scenes of thrilling action e.g. in a war film or disaster movie.
Long Shot
Long Shot (sometimes referred to as a full shot or a wide shot) typically shows the entire object or human figure and is usually intended to place it in some relation to its surroundings. Also gives a lot of the same effects of an extreme long shot.
Medium Long Shot
Also known as a three-quarters shot. Frames the whole subject from the knees up.
Medium Shot
Shows some details about the subject and the scene. If the subject was a human for example, we would see the person from about the waist up.
Medium Close Up Shot
Is around half way between a close up and a medium shot. Showing 1/3 of the subject. This shot is useful when trying to convey the emotions of several people at once when a close up would cut a person out of the frame.
Close Up Shot
Often used to show the whole face of the subject. The subject fills the entire frame, excluding some background, due to the aspect ratio. This kind of shot is very important because of how it highlight one characters emotions and can convey this to an audience better than most other kind of shot.
Extreme Close Up
An extremely close view of a specific feature of the subjects face, e.g. the eyes or mouth. This conveys very specific emotions or actions such as pupils dilating or smiling.
_______________________________________________________________________
Rule of Thirds
The rule of thirds is a "rule of thumb" or guideline which applies to the process of composing visual images. How it works is that the image can be split into 9 equally sized parts, divided by two vertical and two horizontal lines. The four lines create four intersections, which should serve as the main points of interest. Proponents of the technique claim that aligning a subject with these points creates more tension, energy and interest in the composition than simply centering the subject.
Golden Spiral (Fibonacci spiral)
Fibonacci discovered that this “golden spiral” appears in several places throughout nature. More importantly, the Fibonacci spiral is pleasing to the human eye. In terms of actual photography, there is not much to worry about the technical explanation. Fibonacci Spirals are useful for nearly every kind of photography, but they’re especially good for landscapes and wide shots. The spiral basically has a way of leading your eye naturally from the focal point outwards.
Monday, March 28, 2016
BSA101 - Lights (Week 6)
A domestic circuit can take up to 2400watts and never to be overloaded.
Red head - 800w
Blonde - 2400w
An RCD (Residual Current Device) is needed when a light is to be setup. This prevents you from being electrocuted if anything goes wrong.
SPARKING is called before switching on the lights to prevent people from being blinded by the light.
Diffusions Gels spreads the projected beam of light over the subject. Some loss of light will possibly be seen. The greater the diffusion, the greater and more even the resultant spread of light. Shadows are reduced. Used to smooth out beam scallops when lighting cycloramas or in tight spaces.
3 Point Lighting
Consists of Key Light, Fill Light, and Backlight/Rim-Light/Hair-light.
Key Light - Primary Light Source
Fill Light - Fill the shadows created by the Key Light, preventing them from getting too dark
Backlight - Used to separate the subject from the background
_______________________________________________________________________
Types of Lights
There are many types of lights. Tungsten, HMI, Fluorescent, LED.
Tungsten (~3200K)

They are very similar to the light bulbs at home but much more powerful. Tungsten bulbs produce an orange hue. The lamps require a lot of power and do get very hot, but they offer a higher color temperature than incandescent tungsten bulbs. Tungsten lights are dimmable, which allows you to adjust them as needed. They are usually used for lighting interiors. A blue gel can be used to create a daylight illusion.
HMI (~5600K)

Hydrargyrum Medium-Arc Iodide (HMI) lights are the most used type of light on set. HMI lights emit an ultraviolet light with a blue hue. To power up, HMI lights require an electrical ballast. The ballast ignites the metal-halide gas and mercury vapor mix in the bulb. Ballasts also limit the current to prevent flickering. HMI lamps are up to four times more powerful than traditional incandescent bulbs.
The age of an HMI bulb is very important. During its first few hours, a brand new bulb will have a color temperature up to 15,000K. These bulbs should be left on to reach the optimal range of 5600K, which is close to daylight. Bulbs should not be used past half their lifetime. The bulbs require more voltage and the color temperature will continue to decrease 1 kelvin every hour burnt, eventually risking serious damage if used too long.
HMI lights are rather expensive lights, but they are much more efficient. The bulbs can only be dimmed to 50%, but it causes the color temperature to rise to a stronger blue. If blown out or dropped, HMI bulbs will explode hot glass and mercury vapor.
Fluorescent (2700K – 6500K)

Fluorescent bulbs were notorious for flickering and having a very ugly orange-green hue. Recently, new bulbs and fixtures with ballasts have been developed. The new bulbs are flicker free and offer multiple color temperatures. They have a very soft light that is more efficient that an incandescent bulb, and can offer an output similar to HMI lights. Depending on the mix of phosphors in the bulbs, the color temperature can range from tungsten up to natural daylight. Fluorescent bulbs are often packed into small fixtures, allowing them to be compact and lightweight. They are also much cooler than any other bulb option.
LED (White: 3000K – 5600K)

Light Emitting Diodes (LED) have recently become much more prevalent on small sets. White LED lights are most popular, but LEDs are actually manufactured in every color. The diodes are designed to offer directional light. They are very efficient but are still limited in overall output, which is why they tend to only be used on small budget projects.
LED lights offer soft and even lighting. They are incredibly high efficient and can be battery powered. They can easily be dimmed and simply moved along the color spectrum. They have a long lifespan and will not explode.
Red head - 800w
Blonde - 2400w
An RCD (Residual Current Device) is needed when a light is to be setup. This prevents you from being electrocuted if anything goes wrong.
SPARKING is called before switching on the lights to prevent people from being blinded by the light.
Diffusions Gels spreads the projected beam of light over the subject. Some loss of light will possibly be seen. The greater the diffusion, the greater and more even the resultant spread of light. Shadows are reduced. Used to smooth out beam scallops when lighting cycloramas or in tight spaces.
3 Point Lighting
Consists of Key Light, Fill Light, and Backlight/Rim-Light/Hair-light.
Key Light - Primary Light Source
Fill Light - Fill the shadows created by the Key Light, preventing them from getting too dark
Backlight - Used to separate the subject from the background
_______________________________________________________________________
Types of Lights
There are many types of lights. Tungsten, HMI, Fluorescent, LED.
Tungsten (~3200K)
They are very similar to the light bulbs at home but much more powerful. Tungsten bulbs produce an orange hue. The lamps require a lot of power and do get very hot, but they offer a higher color temperature than incandescent tungsten bulbs. Tungsten lights are dimmable, which allows you to adjust them as needed. They are usually used for lighting interiors. A blue gel can be used to create a daylight illusion.
HMI (~5600K)
Hydrargyrum Medium-Arc Iodide (HMI) lights are the most used type of light on set. HMI lights emit an ultraviolet light with a blue hue. To power up, HMI lights require an electrical ballast. The ballast ignites the metal-halide gas and mercury vapor mix in the bulb. Ballasts also limit the current to prevent flickering. HMI lamps are up to four times more powerful than traditional incandescent bulbs.
The age of an HMI bulb is very important. During its first few hours, a brand new bulb will have a color temperature up to 15,000K. These bulbs should be left on to reach the optimal range of 5600K, which is close to daylight. Bulbs should not be used past half their lifetime. The bulbs require more voltage and the color temperature will continue to decrease 1 kelvin every hour burnt, eventually risking serious damage if used too long.
HMI lights are rather expensive lights, but they are much more efficient. The bulbs can only be dimmed to 50%, but it causes the color temperature to rise to a stronger blue. If blown out or dropped, HMI bulbs will explode hot glass and mercury vapor.
Fluorescent (2700K – 6500K)

Fluorescent bulbs were notorious for flickering and having a very ugly orange-green hue. Recently, new bulbs and fixtures with ballasts have been developed. The new bulbs are flicker free and offer multiple color temperatures. They have a very soft light that is more efficient that an incandescent bulb, and can offer an output similar to HMI lights. Depending on the mix of phosphors in the bulbs, the color temperature can range from tungsten up to natural daylight. Fluorescent bulbs are often packed into small fixtures, allowing them to be compact and lightweight. They are also much cooler than any other bulb option.
LED (White: 3000K – 5600K)
Light Emitting Diodes (LED) have recently become much more prevalent on small sets. White LED lights are most popular, but LEDs are actually manufactured in every color. The diodes are designed to offer directional light. They are very efficient but are still limited in overall output, which is why they tend to only be used on small budget projects.
LED lights offer soft and even lighting. They are incredibly high efficient and can be battery powered. They can easily be dimmed and simply moved along the color spectrum. They have a long lifespan and will not explode.
Monday, March 21, 2016
BSA101: Camera Audio (Week 5)
This week, we learned about audio channels on a camera and how it works. It consists of Channel 1 and Channel 2. When one channel is selected, it allows you to record in stereo (Left/Right). But when two channel is selected, it will be recorded in mono which is intended to be heard as if it were a single channel of sound perceived as coming from one position
The internal and external buttons decides where the audio sound is being sourced from. Internal means the microphone on the camera itself, external means i.e. an external boom mic that is plugged in. When a microphone is connected to the camera, it can be switched between line, mic or mic + 48Volts (also known as Fantom mode. It is where no internal battery is required to power the mic, thus using the power coming from the camera battery)
AGC also known as Automatic Gain Control, the purpose of which is to provide a controlled signal amplitude at its output, despite variation of the amplitude in the input signal.
BSA101: Differences between Interframe and Intra-frame compression (Week 4)
Interframe
An inter frame is a frame in a video compression stream which is expressed in terms of one or more neighboring frames. The "inter" part of the term refers to the use of Inter frame prediction. This kind of prediction tries to take advantage from temporal redundancy between neighboring frames allowing to achieve higher compression rates. It is divided into blocks known as macroblocks. After that, instead of directly encoding the raw pixel values for each block, the encoder will try to find a block similar to the one it is encoding on a previously encoded frame, referred to as a reference frame.
Intra-Frame
Intra-frame coding is used in video coding (compression). It is part of an intra-frame codec like ProRes: a group of pictures codec with inter frames. The term intra-frame coding refers to the fact that the various lossless and lossy compression techniques are performed relative to information that is contained only within the current frame, and not relative to any other frame in the video sequence.
Under which circumstances might you use either of these?
When editing video footage, you will get a better performance if you are using video with Intra-frame compression because it include Prores 422, Prores 4444, Photo-JPEG, any image sequences, while popular inter-frame codecs are H264 and MPEG-4. So it all depends on what is going to produce.
Friday, March 4, 2016
BSA101: White Balance, Zebra, Peaking, Natural Density and Mics (Week 3)
White balance (WB)
The process of removing unrealistic color casts, so that objects which appear white in person are rendered white in your photo. Proper camera white balance has to take into account the "color temperature" of a light source, which refers to the relative warmth or coolness of white light.
There are 3 functions on the camera for White Balance. B, A and Preset.
B - Depending on when you unbox the camera, if the switch is at B, it has been set to auto. This can be changed in the settings. (Usually set to warm colour by pointing the camera on a light blue object and hitting the auto balance button)
A - Usually set to cool colour by pointing the camera on a white paper and having the white value above 90%.
Preset - Will usually be at 5600 K
Zebra
Zebra patterning is a feature found on some prosumer and most professional video cameras to aid in correct exposure. When enabled, areas of the image over a certain threshold are filled with a striped or cross-hatch pattern. Often, two thresholds are available: 70% and 100%.

Peaking
a focusing aid in live preview or electronic viewfinders on digital cameras that places a white or coloured highlight on in-focus edges (contours) within an image using an edge detect filter.

Natural Density Filter (ND)
In photography and optics, a neutral-density filter, or ND filter, is a filter that reduces or modifies the intensity of all wavelengths, or colors, of light equally, giving no changes in hue of color rendition. It can be a colorless (clear) or grey filter.

Microphones
Pick up patterns.
Different mics has different pick up patterns. In this course, we have the choice of a cardioid or shotgun mic.
A cardioid mic is usually used for an interview where you won't get much background noise as compared to a shotgun mic. A shotgun mic is when you can pick up background noises, for example: If you're interviewing someone and there's an aircon sound running in the background, you'll hear the aircon as compared to the cardioid where you won't hear the aircon sound.
BUZZ TRACK
The buzz track, also known as atmos track (short for atmosphere) is where sound recordists record up to a minute silence at each location in the film. Obviously these tracks won't be completely silent, they will have the normal noise evident when the actors and crew aren’t there.
The process of removing unrealistic color casts, so that objects which appear white in person are rendered white in your photo. Proper camera white balance has to take into account the "color temperature" of a light source, which refers to the relative warmth or coolness of white light.
There are 3 functions on the camera for White Balance. B, A and Preset.
B - Depending on when you unbox the camera, if the switch is at B, it has been set to auto. This can be changed in the settings. (Usually set to warm colour by pointing the camera on a light blue object and hitting the auto balance button)
A - Usually set to cool colour by pointing the camera on a white paper and having the white value above 90%.
Preset - Will usually be at 5600 K
Zebra
Zebra patterning is a feature found on some prosumer and most professional video cameras to aid in correct exposure. When enabled, areas of the image over a certain threshold are filled with a striped or cross-hatch pattern. Often, two thresholds are available: 70% and 100%.

Peaking
a focusing aid in live preview or electronic viewfinders on digital cameras that places a white or coloured highlight on in-focus edges (contours) within an image using an edge detect filter.
Natural Density Filter (ND)
In photography and optics, a neutral-density filter, or ND filter, is a filter that reduces or modifies the intensity of all wavelengths, or colors, of light equally, giving no changes in hue of color rendition. It can be a colorless (clear) or grey filter.
Microphones

Pick up patterns.
Different mics has different pick up patterns. In this course, we have the choice of a cardioid or shotgun mic.
A cardioid mic is usually used for an interview where you won't get much background noise as compared to a shotgun mic. A shotgun mic is when you can pick up background noises, for example: If you're interviewing someone and there's an aircon sound running in the background, you'll hear the aircon as compared to the cardioid where you won't hear the aircon sound.
BUZZ TRACK
The buzz track, also known as atmos track (short for atmosphere) is where sound recordists record up to a minute silence at each location in the film. Obviously these tracks won't be completely silent, they will have the normal noise evident when the actors and crew aren’t there.
BSA101 & BSA105 - Week 3 (Linked study of Histogram, Waveform and Lumier)
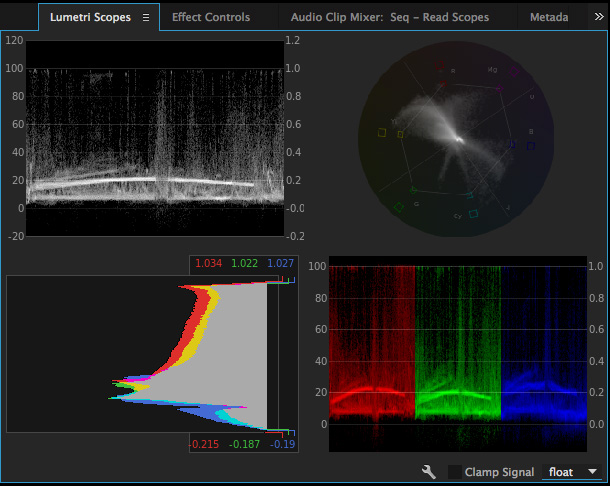
In this weeks class of BSA101 and BSA105, we looked through some other functions on the camera and premier pro and what they do. We went through Historgram, Waveform, White Balance and Lumetri Scopes. I found that they link together because of the similarities they have with each other on the camera and premier pro.
Vectorscope
The Vectorscope displays the video’s chrominance information in a a circular chart. Saturation is measured from the center of the chart outward.
Vectorscopes work in YUV and HLS (Hue, Lightness, Saturation) modes. The YUV Vectorscope uses the more familiar YUV color space including color targets to display the pixel distribution in your images more intuitively. The YUV vectorscope is the default option.
Histogram
Histogram shows RGB values. The minimum Luma values per channel are displayed as numerical feedback at the bottom. Maximum values are displayed at the top. Two horizontal lines indicate the output range. Similar to the Histogram in Photoshop, it shows the distribution of pixels in an image from pure black at the bottom to pure white at the top.
RGB Parade
RGB Parade scope displays separate waveforms for the red, green, and blue components of an image. The waveforms are displayed side by side, making it easy to compare the relative levels of reds, greens, and blues in an image, and make adjustments as required. The RGB Parade scope also makes it easy to spot color casts in your image.
Waveform Monitor or Luma Waveform
It displays the gray-scale values in the image under the playhead, where high luma levels appear as spikes on the waveform, and low luma levels appear as dips. This scope lets you quickly identify highlights and shadows in your image, helping you achieve precise black-and-white balancing. (Something like exposure)
*Clamp Signal : To lock the lumetri scope at 100%*
There are five scopes to choose from in premier pro, which you can access by clicking the Wrench icon in the lower right corner of the scopes panel:
- Vectorscope HLS (Hue, Light, Saturation)
- Vectorscope YUV
- Histogram
- Parade (RGB or YUV)
- Waveform Monitor or Luma Waveform

Vectorscope
The Vectorscope displays the video’s chrominance information in a a circular chart. Saturation is measured from the center of the chart outward.
Vectorscopes work in YUV and HLS (Hue, Lightness, Saturation) modes. The YUV Vectorscope uses the more familiar YUV color space including color targets to display the pixel distribution in your images more intuitively. The YUV vectorscope is the default option.
Histogram
Histogram shows RGB values. The minimum Luma values per channel are displayed as numerical feedback at the bottom. Maximum values are displayed at the top. Two horizontal lines indicate the output range. Similar to the Histogram in Photoshop, it shows the distribution of pixels in an image from pure black at the bottom to pure white at the top.
RGB Parade
RGB Parade scope displays separate waveforms for the red, green, and blue components of an image. The waveforms are displayed side by side, making it easy to compare the relative levels of reds, greens, and blues in an image, and make adjustments as required. The RGB Parade scope also makes it easy to spot color casts in your image.
Waveform Monitor or Luma Waveform
It displays the gray-scale values in the image under the playhead, where high luma levels appear as spikes on the waveform, and low luma levels appear as dips. This scope lets you quickly identify highlights and shadows in your image, helping you achieve precise black-and-white balancing. (Something like exposure)
*Clamp Signal : To lock the lumetri scope at 100%*
Monday, February 29, 2016
BSA 101: The functions on cameras (Week 2)
On this weeks class, we went through some camera functions and the basics of what each and one of them does. First of all, we talked about ASA (American Standard Association) which was later changed to ISO (International Standards Organization). ASA/ISO is known as film speed.
We then got to look at the two cameras which we will mostly be using during the course.
Sony PMW-EX1R HDCAM

Canon XF305

We were then introduced to Gain.
Gain is an electronic amplification of the video signal. This means that the signal is boosted electronically, adding more voltage to the pixels on the imager causing them to amplify their intensity and brighten the image. This voltage increase is measured in decibels (dB). A +6dB Gain is equal to a 2x increase in the signal. A +12dB Gain is equal to 2 x 2 or 4x increase in the signal. A +18dB is a 2 x 2 x 2 or 8x increase in the signal. When we express Gain as dB, every +6dB increase represents another doubling the signal. Another way to think of it as F Stops.
+6dB = Adds 1 F Stop of light
+12dB = Adds 2 F Stops of light
+18dB = Adds 3 F Stops of light
If +6dB is like adding an F Stop, +3dB is like adding 1/2 an F Stop of light and +2dB is like adding 1/3 an F Stop. Information supplied by Bob Diaz via DVXuser.com
EDIT
From what I can tell after borrowing and playing with the EX1, I wasn't really fond with the focus as it didn't show the blur in the background when I wanted the focus to be on the object in front of the camera and the focus ring was a bit tight where I couldn't get a smooth feeling on it.
In simpler terms, the higher the number of your ASA/ISO, the more sensitive it it towards light. So basically, if you use higher ASA/ISO numbers you will get a picture with lots of noise.
This then lead us towards the exposure triangle.
What is Aperture?
Aperture is like the iris. It controls the amount of light transmitted into the sensor of the camera. Lower f/stops number means Shallow Depth of Focus and more light. While, Bigger f/stops number means Greater Depth of Focus and less light. Each f/stops either halves or doubles the amount of light entering the camera. An easier way to put this is Lower Aperture = More light and Higher Aperture = Less Light.
What is Shutter Speed?
Shutter speed controls the time for how long a shutter is open. This controls the duration of the how much light is allowed to enter and reach the sensor. It is responsible for creating dramatic effects by either a freezing or blurring action. If the shutter speed is low (for example, 1/100), it can create an effect called "motion blur". This is where moving objects appear blurred along the direction of the motion.We then got to look at the two cameras which we will mostly be using during the course.
Sony PMW-EX1R HDCAM
Canon XF305
We were then introduced to Gain.
Gain is an electronic amplification of the video signal. This means that the signal is boosted electronically, adding more voltage to the pixels on the imager causing them to amplify their intensity and brighten the image. This voltage increase is measured in decibels (dB). A +6dB Gain is equal to a 2x increase in the signal. A +12dB Gain is equal to 2 x 2 or 4x increase in the signal. A +18dB is a 2 x 2 x 2 or 8x increase in the signal. When we express Gain as dB, every +6dB increase represents another doubling the signal. Another way to think of it as F Stops.
+6dB = Adds 1 F Stop of light
+12dB = Adds 2 F Stops of light
+18dB = Adds 3 F Stops of light
If +6dB is like adding an F Stop, +3dB is like adding 1/2 an F Stop of light and +2dB is like adding 1/3 an F Stop. Information supplied by Bob Diaz via DVXuser.com
EDIT
From what I can tell after borrowing and playing with the EX1, I wasn't really fond with the focus as it didn't show the blur in the background when I wanted the focus to be on the object in front of the camera and the focus ring was a bit tight where I couldn't get a smooth feeling on it.
Monday, February 22, 2016
BSA 101: Introduction to Filmmaking (Week 1)
This week, we introduced ourselves to the class and also went through what we have to do for this subject. We went through the handbook briefly and were told that it will have a slight connection with BSA105 in terms of assessments. We will be looking on how to handle, store, and care for the tools that will be borrowed to us for our assignments in the coming week.
Subscribe to:
Posts (Atom)